Create Custom Discovery Rules
A custom discovery rule describes domains you want discovery to find, using filters on their WHOIS, DNS, SSL and website data or on their names. The filters select which domains in Deepinfo's dataset become candidates. What a rule finds appears in the Discovery review list, with the rule's name on its badge.
Before You Start
- Package: External Attack Surface Management (EASM).
- Role: Admin or Member.
- For the rules Deepinfo runs for you, see Tune smart discovery.
Where to Find It
Sidebar: EXTERNAL ATTACK SURFACE MANAGEMENT › ASSETS › DISCOVERY · Tab: SETTINGS · https://platform.deepinfo.com/app/easm/discoveries/settings/custom-rules
On the SETTINGS tab, select Custom Rules in the menu on the left.
Read the Screen
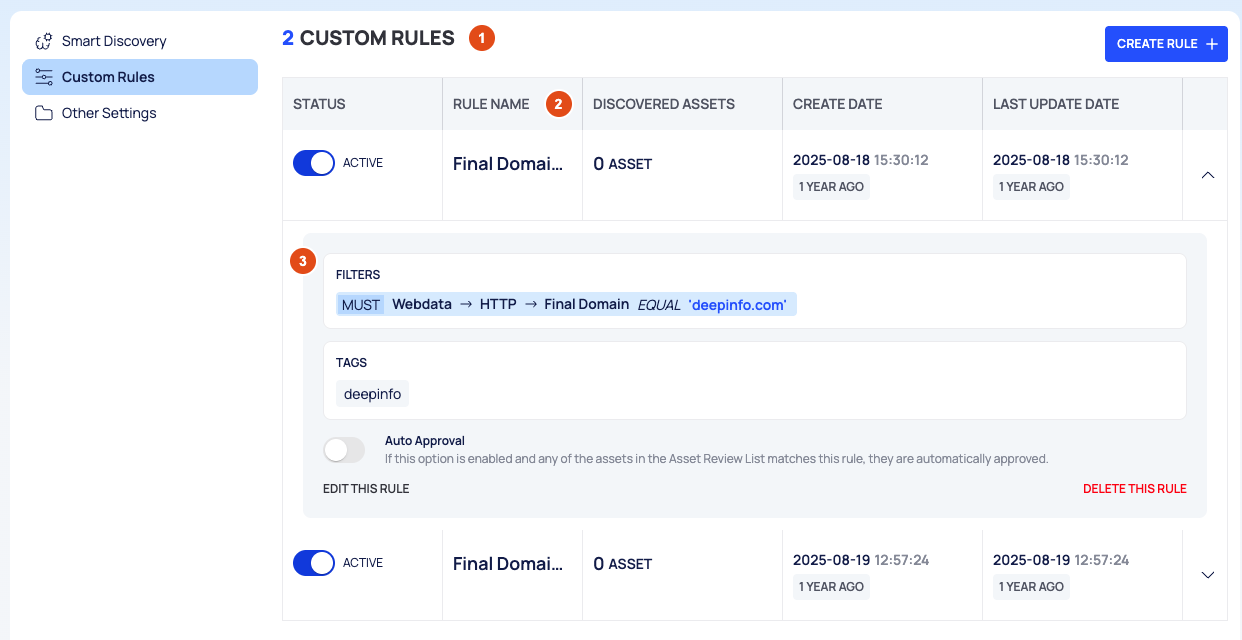
Header: the number of custom rules and CREATE RULE +.
The rules table:
Column What it shows STATUS A switch, and whether the rule is active RULE NAME The rule's name DISCOVERED ASSETS How many assets the rule has discovered CREATE DATE When the rule was created LAST UPDATE DATE When it was last changed (chevron) Expands the rule An expanded rule shows:
- FILTERS, each written as rule · category · field · operator · value, for example MUST · Webdata · HTTP · Final Domain · EQUAL · a domain name;
- TAGS;
- the Auto Approval switch;
- EDIT THIS RULE and DELETE THIS RULE.
Create a Rule
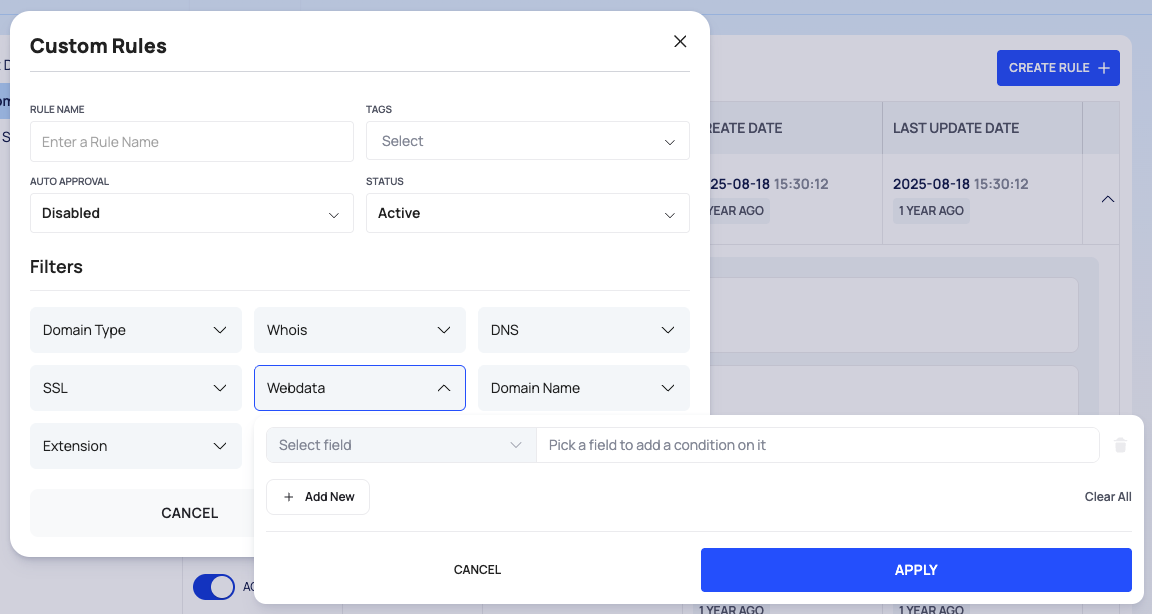
Select CREATE RULE +. The Custom Rules dialog opens.
Enter a RULE NAME. You will see it on the rule badges in the Discovery lists.
Optional: choose TAGS from Select, or type a new tag.
Set AUTO APPROVAL. It is Disabled by default: what the rule finds waits for your review. With Enabled, what it finds is added to your inventory directly.
Set STATUS. It is Active by default.
Add at least one filter. Select a category chip: Domain Type, Whois, DNS, SSL, Webdata, Domain Name, Extension or Subdomain. In the popover:
- Pick the field, then the rule (Must, for example), the operator (Equal, for example) and the Value.
- Select Add New to add another condition, or Clear All to start over.
- Select APPLY.
Domain Type takes Only Domain or Only Subdomain.
Select CREATE. It becomes available once the rule has a name and at least one filter.
The rules Must, Must Not and Should work as in the API; see Search & filters and Search, filter and export lists.
Caution
With AUTO APPROVAL enabled, the assets the rule finds go straight into your inventory, and an approval cannot be undone from Discovery. Start with auto approval off, check what the rule finds in Discovery, and turn it on once the results look right.
Change, Pause or Delete a Rule
Expand the rule first.
- Change it: select EDIT THIS RULE. The same dialog opens with your settings. Change them and select UPDATE.
- Pause it: turn off its STATUS switch and confirm. Turn it on again the same way.
- Turn auto approval on or off: select the Auto Approval switch and confirm.
- Delete it: select DELETE THIS RULE. The Delete Rule confirmation names the rule. Select DELETE.
Good to Know
- A rule name can be long; the table may shorten it. Expand the rule to see its filters.
- A rule has up to 10 tags.
- To keep specific assets out of discovery whatever your rules find, use the Ignored Assets list; see Tune smart discovery.
Do This With the API
- List your custom rules: Asset Discovery Custom Discovery Rule Search
- Create a rule: Asset Discovery Custom Discovery Rule Create
- Change a rule: Asset Discovery Custom Discovery Rule Update
- Delete a rule: Asset Discovery Custom Discovery Rule Delete