Change the State of Issues and Vulnerabilities
When you have decided what to do about a finding, record it by changing its state: ignore it, accept the risk, or mark it as resolved or as a false positive. The same states apply to issues and to vulnerabilities on an asset.
Before You Start
- Package: External Attack Surface Management (EASM).
- Role: Admin or Member.
- You need at least one issue, or one vulnerability on an asset.
Where to Find It
Sidebar: EXTERNAL ATTACK SURFACE MANAGEMENT › ISSUES · Tab: ISSUE LIST · https://platform.deepinfo.com/app/easm/issues
On the ISSUE LIST, untick GROUP BY ISSUE TYPES first. You can also change a state wherever the state chip can be selected, or through a menu:
| Where | How |
|---|---|
| Issue List, with GROUP BY ISSUE TYPES unticked | Select the STATE chip, or tick rows for a bulk change |
| Issue drawer, and the issue's own page under its asset | … › CHANGE STATE (on the page: CHANGE STATE) |
| Asset detail page, ISSUES tab | Select the STATE chip, or tick rows for a bulk change |
| Issue type page, ASSETS tab | Select the STATE chip of an asset |
| CVE drawer (from the Vulnerability List), ASSETS tab | Select the state chip of an asset |
| CVE page, ASSETS tab | Select the STATE chip of an asset |
| Asset detail page, VULNERABILITIES tab | Tick rows for a bulk change |
The VULNERABILITIES LIST itself has no state chips: its rows are CVEs, and a CVE is only ACTIVE or INACTIVE. Change the state per asset instead.
Change One Item From Its State Chip
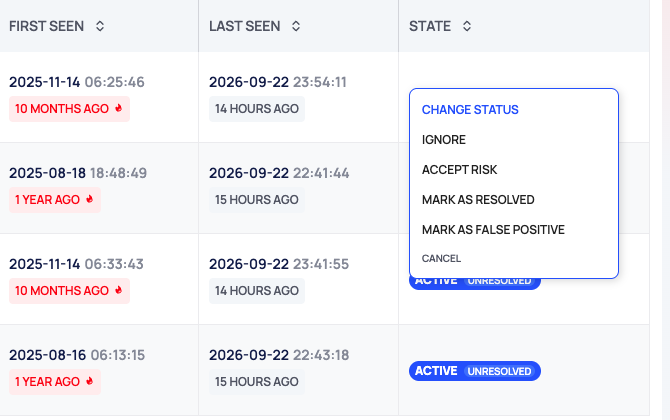
- Select the state chip.
- The CHANGE STATUS menu lists IGNORE, ACCEPT RISK, MARK AS RESOLVED and MARK AS FALSE POSITIVE, without the current state. Select one.
- A confirmation shows how many items will change and the new state. Select CHANGE.
- The confirmation stays open for a few seconds while the change is applied. Then the list refreshes and a message confirms the change, with UNDO.
To leave the menu without a change, select CANCEL.
Change One Issue From Its Drawer
- On the Issue List, untick GROUP BY ISSUE TYPES and select the issue's row.
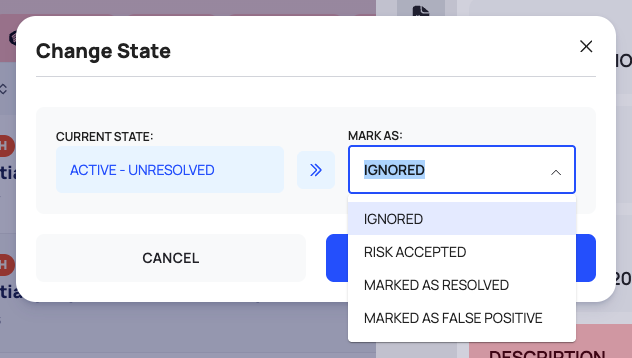
- In the drawer, open the … menu and select CHANGE STATE.
- The Change State popup shows the CURRENT STATE: and, after an arrow, the MARK AS: list. The list starts on IGNORED; the other choices are RISK ACCEPTED, MARKED AS RESOLVED and MARKED AS FALSE POSITIVE. Check your choice before you select CHANGE.
- Confirm with CHANGE.
To close the popup without a change, select CANCEL.
Change Several Issues at Once
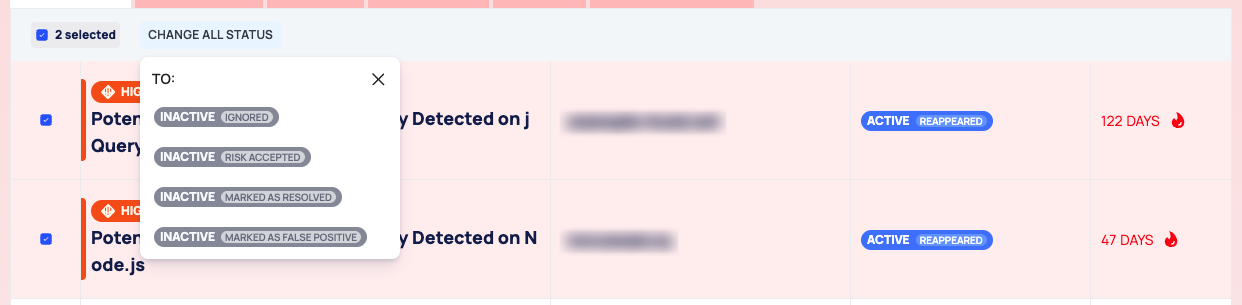
- Tick the rows you want to change. To tick every row on the page, open the checkbox menu and select SELECT THIS PAGE. The bar shows how many rows are selected; CLEAR SELECTION unticks them.
- Select CHANGE ALL STATUS.
- Under TO:, choose IGNORED, RISK ACCEPTED, MARKED AS RESOLVED or MARKED AS FALSE POSITIVE.
- Confirm with CHANGE.
On the Issue List, a bulk change applies to the rows you ticked.
Revert or Undo a Change
You can take back a state you set in three ways:
- UNDO in the message that appears after a change. It asks you to confirm again.
- REVERT IT in the state chip's menu, shown for IGNORED, RISK ACCEPTED, MARKED AS RESOLVED and MARKED AS FALSE POSITIVE.
- REVERT STATE in the Change State popup, shown for the same states.
Each asks for confirmation. The bulk TO: menu has no revert option; use UNDO right after a bulk change.
Change the State of a Vulnerability on an Asset
A CVE can affect several assets, and each asset has its own state for it.
- Open the CVE: select its row in the Vulnerability List and open the drawer's ASSETS tab, or open the CVE page and its ASSETS tab.
- Select the state chip of the asset.
- Choose IGNORE, ACCEPT RISK, MARK AS RESOLVED or MARK AS FALSE POSITIVE.
- Confirm with CHANGE. A message confirms the change, with UNDO.
To change several vulnerabilities of one asset together, open the asset's detail page, go to the VULNERABILITIES tab, tick the rows and select CHANGE ALL STATUS. Choose the new state under TO: and confirm with CHANGE.
The Issue States
Every issue, and every vulnerability on an asset, has one state. It is shown as a two-part chip, for example ACTIVE | NEWLY DETECTED. Filters list the same states as Active - Newly Detected and so on.
| Group | State | Set by | Action that sets it |
|---|---|---|---|
| ACTIVE | NEWLY DETECTED | the platform | None |
| ACTIVE | UNRESOLVED | the platform | None |
| ACTIVE | REAPPEARED | the platform | None |
| INACTIVE | NOT APPLICABLE | the platform | None |
| INACTIVE | VERIFIED RESOLVED | the platform | None |
| INACTIVE | IGNORED | you | IGNORE |
| INACTIVE | RISK ACCEPTED | you | ACCEPT RISK |
| INACTIVE | MARKED AS RESOLVED | you | MARK AS RESOLVED |
| INACTIVE | MARKED AS FALSE POSITIVE | you | MARK AS FALSE POSITIVE |
Every regular scan checks each issue again. When the signal is gone, the platform sets VERIFIED RESOLVED on its own, with no one having to mark it first; when a scan cannot tell, it sets NOT APPLICABLE; if a resolved signal returns, the issue reopens as REAPPEARED. MARKED AS RESOLVED waits for that check. The states your team sets are optional and kept on record.
Only the states you set (IGNORED, RISK ACCEPTED, MARKED AS RESOLVED and MARKED AS FALSE POSITIVE) can be reverted. Reverting returns the item to its previous, active state.
Good to Know
- The states you set are all inactive. Lists that show active items only drop the item after the change. In the Issue List and on the asset's ISSUES tab, tick SHOW INACTIVES to see it again.
- A change takes a few seconds to apply. Wait for the list to refresh before you check the result.
- The CHANGE STATUS menu also opens on states the platform set, such as VERIFIED RESOLVED. States set by the platform (NEWLY DETECTED, UNRESOLVED, REAPPEARED, NOT APPLICABLE, VERIFIED RESOLVED) cannot be reverted.
Do This With the API
Issues:
Vulnerabilities on an asset:
- Vulnerability Ignore
- Vulnerability Accept Risk
- Vulnerability Mark Resolved
- Vulnerability Mark False Positive
- Vulnerability Revert
Warning
These endpoints change every record that matches the filter you send, and an empty filter matches all records. Always send a filter.