Change the State of Exposed Credentials
When you have dealt with a leaked credential, record it by changing the credential's state: ignore it, accept the risk, or mark it as resolved or as a false positive. The steps below are for the credentials of your employees. Client and payment credentials have states too.
Before You Start
- Package: Cyber Threat Intelligence (CTI).
- Role: Admin or Member.
- You need at least one exposed credential on the EXPOSED CREDENTIALS tab.
Where to Find It
Sidebar: CYBER THREAT INTELLIGENCE › COMPROMISED EMPLOYEE DATA · Tab: EXPOSED CREDENTIALS · https://platform.deepinfo.com/app/cti/compromised-employee-data/credential-exposures
The state of a credential appears in these places:
| Where | What you can do there |
|---|---|
| EXPOSED CREDENTIALS tab | Select a STATE chip, or select rows for a bulk change. SHOW INACTIVES includes inactive credentials |
| Credential drawer (select a row on EXPOSED CREDENTIALS) | ⋮ › CHANGE STATE |
| Employee's page, CREDENTIALS tab | STATE column and a header checkbox to select rows; SHOW INACTIVES |
| Employee drawer, CREDENTIALS tab | STATE column; SHOW INACTIVES |
| COMPROMISED CLIENTS tab of Compromised Client Credentials | STATE column; SHOW INACTIVES |
| COMPROMISED PAYMENTS tab of Compromised Payment Credentials | STATE column |
Change One Credential From Its State Chip
- On the EXPOSED CREDENTIALS tab, find the credential. Tick SHOW INACTIVES if it is already inactive.
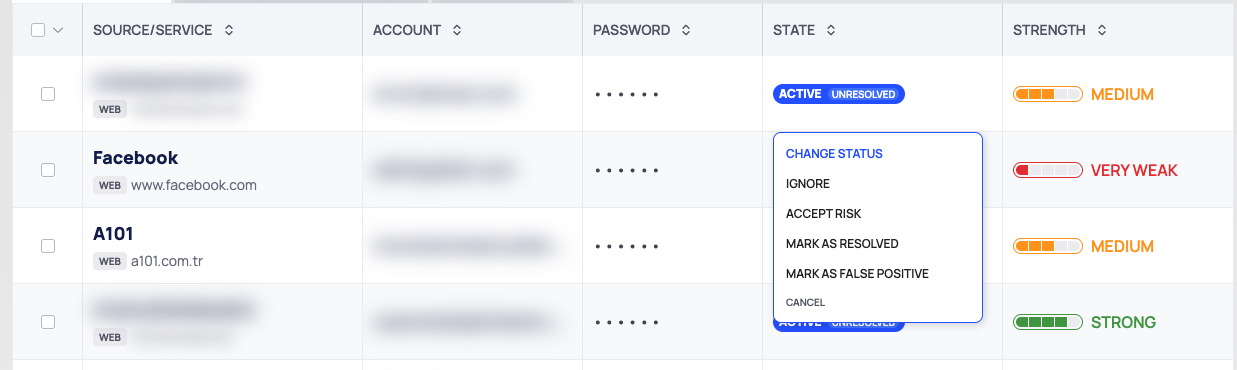
- Select its STATE chip, for example ACTIVE · UNRESOLVED.
- A menu headed CHANGE STATUS opens. Select IGNORE, ACCEPT RISK, MARK AS RESOLVED or MARK AS FALSE POSITIVE.
- If the platform asks you to confirm, confirm the change.
To close the menu without a change, select CANCEL.
Change One Credential From Its Drawer
- On the EXPOSED CREDENTIALS tab, select the credential's row to open its drawer.
- Open the ⋮ menu and select CHANGE STATE.
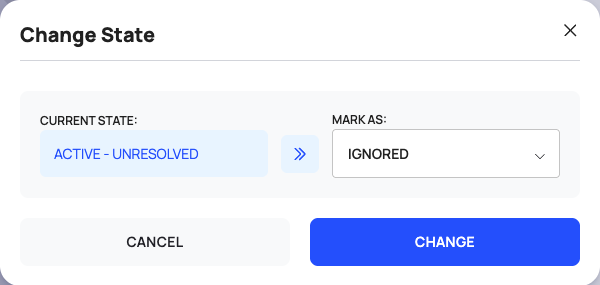
- The Change State window shows CURRENT STATE:, for example "ACTIVE - UNRESOLVED", and a MARK AS: list with IGNORED, RISK ACCEPTED, MARKED AS RESOLVED and MARKED AS FALSE POSITIVE. Choose the new state.
- Select CHANGE. CANCEL closes the window without a change.
Important
MARK AS: is already set to IGNORED when the window opens. Check it before you select CHANGE, or the credential is ignored.
Change Several Credentials at Once
- Tick the rows you want to change. The checkbox in the header has a menu with SELECT THIS PAGE, SELECT ALL RESULTS and CLEAR SELECTION.
- Select CHANGE ALL STATES.
- Under TO:, choose the new state.
- If the platform asks you to confirm, confirm the change.
You can do this on the EXPOSED CREDENTIALS tab and on the CREDENTIALS tab of an employee's page.
Warning
SELECT ALL RESULTS selects every result, on every page, not only the rows you can see, and the state you choose next applies to all of them. Use it only when you mean to change every result. Otherwise, tick the rows or use SELECT THIS PAGE, so that you can see each credential you change.
Revert a Change
The states you set can be reverted. When the current state allows it, the Change State window shows a REVERT STATE link. Reverting returns the credential to its previous, active state.
Caution
Select REVERT STATE only when you mean to revert. It can take effect as soon as you select it, without asking you to confirm.
The States
A credential's state is shown as a two-part chip: the group, then the state, for example ACTIVE · UNRESOLVED.
| Group | State | Set by | Action that sets it |
|---|---|---|---|
| ACTIVE | NEWLY DETECTED | the platform | None |
| ACTIVE | UNRESOLVED | the platform | None |
| INACTIVE | IGNORED | you | IGNORE |
| INACTIVE | RISK ACCEPTED | you | ACCEPT RISK |
| INACTIVE | MARKED AS RESOLVED | you | MARK AS RESOLVED |
| INACTIVE | MARKED AS FALSE POSITIVE | you | MARK AS FALSE POSITIVE |
Only the states you set (IGNORED, RISK ACCEPTED, MARKED AS RESOLVED and MARKED AS FALSE POSITIVE) can be reverted. The platform never closes a credential on its own.
Issues and vulnerabilities in External Attack Surface Management (EASM) use a similar set of states, but there a scan also closes one on its own; see Change the state of issues and vulnerabilities.
Good to Know
- Inactive credentials leave the list. The states you set are inactive, so the credential drops out of lists that show active credentials only. Tick SHOW INACTIVES to see it again.
- Changes take a few seconds. The new state can take a few seconds to show. Wait for the list to refresh before you check the result.
- Follow-up. The CREDENTIAL STATUS STATS card on the CTI dashboard and STATUS STATS on the overview count active and inactive credentials. On the COMPROMISED EMPLOYEES tab, the STATE filter chip finds employees by the states of their credentials, for example by Unresolved Credential Count.
Do This With the API
Employee credentials:
- Compromised Employee Credential Ignore
- Compromised Employee Credential Accept Risk
- Compromised Employee Credential Mark Resolved
- Compromised Employee Credential Mark False Positive
- Compromised Employee Credential Revert
Client credentials:
- Compromised Client Credential Ignore
- Compromised Client Credential Accept Risk
- Compromised Client Credential Mark Resolved
- Compromised Client Credential Mark False Positive
- Compromised Client Credential Revert
Payment credentials:
- Compromised Payment Credential Ignore
- Compromised Payment Credential Accept Risk
- Compromised Payment Credential Mark Resolved
- Compromised Payment Credential Mark False Positive
- Compromised Payment Credential Revert
Warning
These endpoints change every record that matches the filter you send, and an empty filter matches all records. Always send a filter.